


-
Por categoría de producto
-
Buscar por producto
-
Buscar por tipo de pregunta
Este artículo se aplica a FIP10, FIP10P, FIP11C, FIP11CP, FIP13G, FIP14G, FIP15G, FIP16
En el teléfono VOIP, la cuenta (número de extensión) es como la tarjeta SIM en el teléfono móvil. Registrar una cuenta facilita que los teléfonos reciban una llamada entrante o marquen una llamada saliente. Este artículo explicará cómo registrar una cuenta en el teléfono de la serie FIP1X.
Paso 1. Conexión de red
El teléfono de la serie FIP1X admite conexión por cable e inalámbrica.
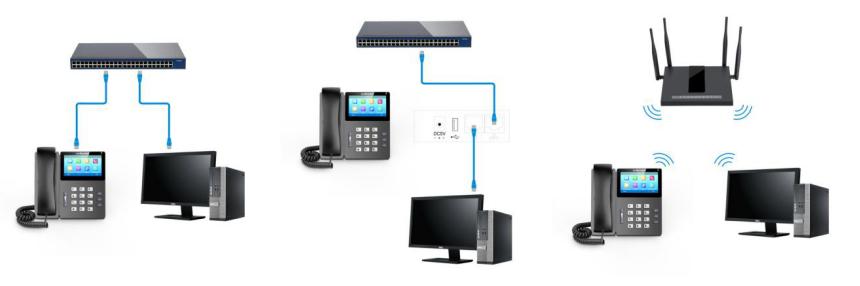
Cuando utilice la conexión inalámbrica, consulte las instrucciones a continuación.
1) Vaya a Menú -> Básico->Wi-Fi.
2) Active Wi-Fi, resalte Red(es) disponible(s).
3) Seleccione una red inalámbrica y conéctese a ella, luego presione OK.
Cuando utilice la conexión por cable, consulte las instrucciones a continuación.
Conecte el enrutador o cambie al puerto de Internet del teléfono ![]() con un cable Ethernet.
con un cable Ethernet.
Nota: Si el teléfono no pudo obtener una dirección IP, consulte el Apéndice para configurar la dirección IP manualmente.
Paso 2. Registro de cuenta
Hay dos formas de registrar la cuenta en el teléfono.
Método 1. a través de la página de administración del teléfono
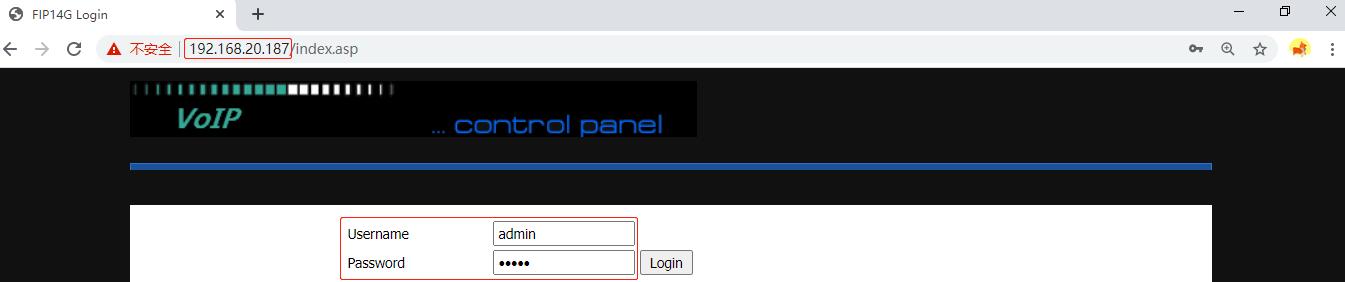
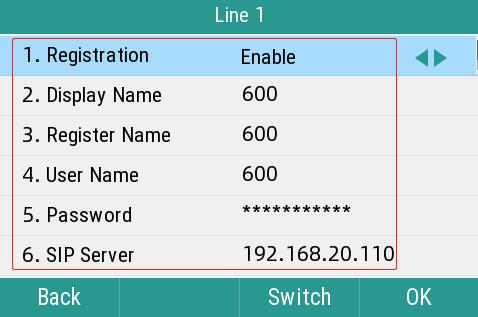
Nota: Antes de la configuración, el administrador del servidor PBX debe proporcionar la siguiente información de registro: nombre de dominio o dirección IP del servidor (como 192.168.20.110), número de puerto (5060), número de cuenta (600), contraseña de la cuenta (contraseña600).
1) Check the phone’s IP address
Press the OK Key ![]() to check the phone’s IP address.
to check the phone’s IP address.
Note: For FIP16, press the OK key, then go to Status to check the IP address.

2) Log in to the phone’s management page.
Type in the phone’s IP address in the address bar of the web browser, then enter the login username and password to log in( the default username and password are ‘admin’).
3) Enter the registration information.
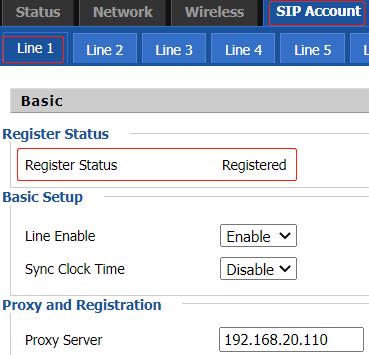
Click SIP Account->Line1, enable the Line, enter the Proxy Server, Proxy port, Display Name, Phone Number, Account and Password, then click Save&Apply.

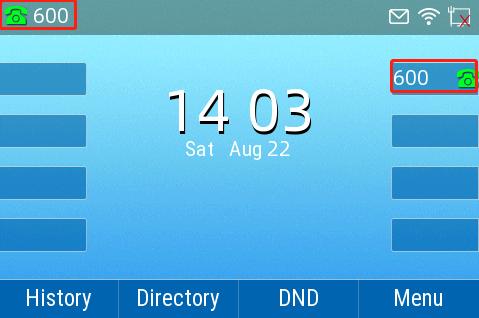
Wait for a moment, the phone will be registered successfully, you will see the Register Status changes to Registered, the LCD screen displays the extension number and a green phone icon, the Line Key lights up green.
Method 2. via the phone’s LCD screen
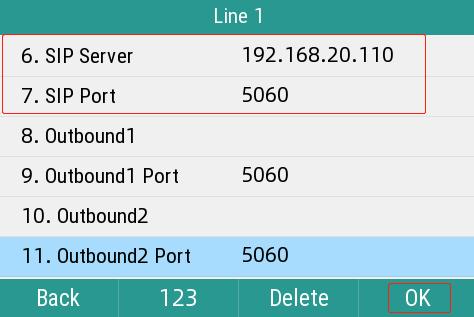
Navigate to Menu ->Advanced(default password is admin)->Accounts->Line 1, enable the Registration, enter the Display Name, Register Name, User Name, Password, SIP Server(server’s domain name or IP address), and SIP Port, then press OK.
Appendix
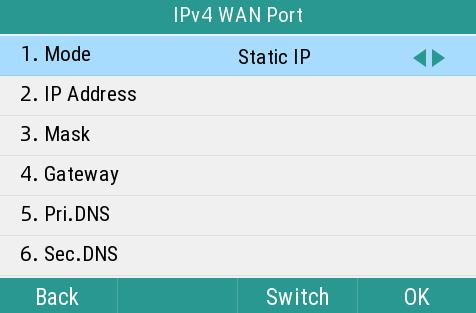
Configure a static IP address on the phone’s LCD screen
Navigate to Menu ->Advanced(default password is admin)->Network->WAN Port->IPv4, change the Mode to Static IP, enter the IP address, Mask, Gateway, Primary DNS and Secondary DNS, then press OK.
 Back to list


